Create a Form In MS WORD.
दोस्तो एम एस आफिस एक एैसा साफ्टवेयर है जिसका उपयोग हर जगह होता है और एम एस आफिस में सबसे ज्यादा एम वर्ड और एम एस एक्सल का उपयोग किया जाता है क्या आप जानते है कि एम एस वर्ड में भी अाप अपना एक साफ्टवेयर क्रियेट कर सकते है तो आइये हम बात करते है एम एस वर्ड में एक फार्म बनानें की ये फार्म नार्मल नहीं होगा यह फार्म डेवलपर टूल में बनेगा आप इसमें हर किसी का डेटा सेव कर सकते है जैसे नाम व पिता का नाम व पता व मोबाइल नम्बर और भी बहुत कुछ तो इसके लिये पहले हम एम एस वर्ड को खोलेंगे उसमें आप देखेंगे कि डेवलपर का टैब नहीं दिखेगा।
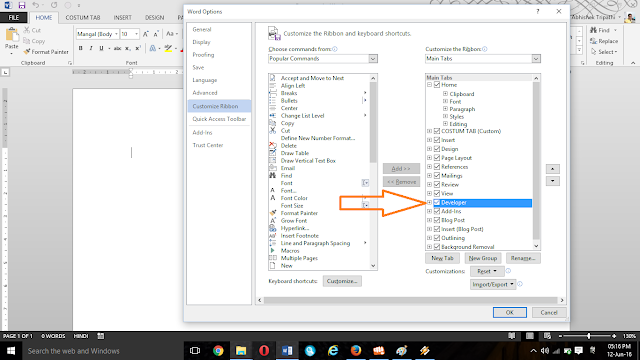
दरअसल में यह टैब हाइड होता है इसके लिये हमें इसे फाइल में जाकरआप्सन पर जाना पड़ेगा फिर
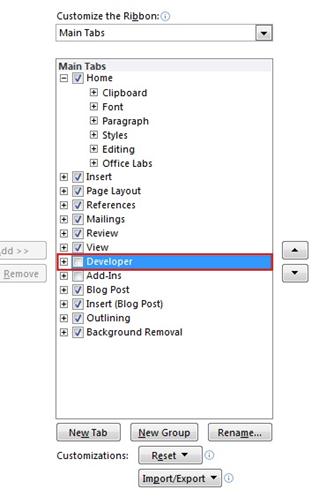
कास्टमाइज टैब में जाकर डेवलपर पर चेक का निसान लगाये जिससे डेवलपर टूल एम एस वर्ड के टैब बार में दिखनें लगेगा।
कास्टमाइज टैब में जाकर डेवलपर पर चेक का निसान लगाये जिससे डेवलपर टूल एम एस वर्ड के टैब बार में दिखनें लगेगा।

हम आपको कुछ स्टेम अग्रेजी में बताते है अगर आपको कुछ समझ में न आये तो आप हमसे पूंछ सकते है।
Step 1: How to Show the Developer tab
Click the File tab :- Click Options. :- Click Customize Ribbon :- Under Customize the Ribbon, click Main Tabs.:- In the list, select the Developer check box, and then click OK.Step 2: How to Open a template or a document on which to base the form
To save time, you can start with a form template. Or you can start with a blank document and save as either a document or template to re-use in the future.Now Start with a form template Click the File tab.
Click New :- Search for Forms in the Templates search box. :- Click the form that matches the type you want to create. :- Click Download if you're using Word 2010, or Create if you're using Word 2013 or 2016. :- Click the File tab again, click Save As and pick a location to save the form.In the Save As dialog box, type a name for the new template or document, and then click Save.
Start with a blank document
If you want to create your own template, start with a new document and save the new document as a templateIn the form document you've created, click the File tab. :- Click Save As :- Under Save as type, select Word template from the menu. :- In the Save As dialog box, type a file name for the new template, and then click Save.
Step 3: Add content to the form
On the Developer tab, in the Controls group, click Design Mode, and then insert the controls that you want.
Insert a text control where users can enter text
In a rich text content control, users can format text as bold or italic, and they can type multiple paragraphs. If you want to limit what users add, insert the plain text content control.-
Click where you want to insert the control.
-
On the Developer tab, in the Controls group, click Rich Text Content Control
 .
.
Insert a picture control
A picture control is often used for templates, but you can also add a picture control to a form.-
Click where you want to insert the control.
-
On the Developer tab, in the Controls group, click Picture Content Control.

Insert a building block control
You can use building block controls when you want people to choose a specific block of text. For example, building block controls are helpful if you’re setting up a contract template, and you need to add different boilerplate text depending on the contract’s specific requirements. You can create rich text content controls for each version of the boilerplate text, and then you can use a building block control as the container for the rich text content controls.You can also use a building block control in a form.
-
Click where you want to insert the control.
-
On the Developer tab, in the Controls group, click Building Block Content Control (in Word 2016, this is labeled Building Block Gallery Content Control).

Insert a combo box or a drop-down list
In a combo box, users can select from a list of choices that you provide or they can type in their own information. In a drop-down list, users can only select from the list of choices.-
On the Developer tab, in the Controls group, click the Combo Box Content Control
 .
.
-
Select the content control, and then on the Developer tab, in the Controls group, click Properties.

-
To create a list of choices, under Drop-Down List Properties, click Add.
-
Type a choice in the Display Name box, such as Yes, No, or Maybe.
Repeat this step until all of the choices are in the drop-down list.
-
Fill in any other properties that you want.
Note: If you select the Contents cannot be edited check box, users won’t be able to click a choice.
Insert a date picker
-
Click where you want to insert the date picker control.
-
On the Developer tab, in the Controls group, click the Date Picker Content Control.

Insert a check box
-
Click where you want to insert the check box control.
-
On the Developer tab, in the Controls group, click the Check Box Content Control.

Use the legacy form controls
-
Click where you want to insert a legacy control.
-
On the Developer tab, in the Controls group, click the Legacy Forms drop-down.
-
Select the Legacy Form control or Active X Control that you want to include.
Step 4: Set or change properties for content controls
Each content control has properties that you can set or change. For example, the Date Picker control offers options for the format you want to use to display the date.-
Click the content control that you want to change.
-
On the Developer tab, in the Controls group, click Properties, and change the properties that you want.
Step 5: Add instructional text to the form
Instructional text can enhance the usability of the form you create and distribute. You can change the default instructional text in content controls.To customize the default instructional text for your form users, do the following:
-
On the Developer tab, in the Controls group, click Design Mode.

-
Click the content control where you want to revise the placeholder instructional text.
-
Edit the placeholder text and format it any way you want.
-
On the Developer tab, in the Controls group, click Design Mode to turn off the design feature and save the instructional text.
Step 6: Add protection to a form
Protecting a form means it can't be changed - people can fill out a protected form, but they can't change the controls or control properties. Add protection to your form by making all the form content into a group.Tip: If you want, you can test the form prior to distributing it. Open the form, fill it out as the user would, and then save a copy in a location that you want.
-
Open the form that you want to add protection to.
-
On the Home tab, in the Editing group, click Select, and then click Select All.

Keyboard shortcut: Click in the document and press CTRL+A.
-
On the Developer tab, in the Controls group, click Group, and then, if prompted, click Group again.


0 comments:
Post a Comment